Data Storage: Setting up GCS
Last updated on 2026-03-03 | Edit this page
Estimated time: 30 minutes
Overview
Questions
- How can I store and manage data effectively in GCP for Vertex AI
workflows?
- What are the advantages of Google Cloud Storage (GCS) compared to local or VM storage for machine learning projects?
Objectives
- Explain data storage options in GCP for machine learning
projects.
- Describe the advantages of GCS for large datasets and collaborative
workflows.
- Outline steps to set up a GCS bucket and manage data within Vertex AI.
Machine learning and AI projects rely on data, making efficient storage and management essential. Google Cloud offers several storage options, but the most common for ML workflows are Virtual Machine (VM) disks and Google Cloud Storage (GCS) buckets.
Consult your institution’s IT before handling sensitive data in GCP
As with AWS, do not upload restricted or sensitive data to GCP services unless explicitly approved by your institution’s IT or cloud security team. For regulated datasets (HIPAA, FERPA, proprietary), work with your institution to ensure encryption, restricted access, and compliance with policies.
Options for storage: VM Disks or GCS
What is a VM disk?
A VM disk is the storage volume attached to a Compute Engine VM or a Vertex AI Workbench notebook. It can store datasets and intermediate results, but it is tied to the lifecycle of the VM.
When to store data directly on a VM disk
- Useful for small, temporary datasets processed interactively.
- Data persists if the VM is stopped, but storage costs continue as
long as the disk exists.
- Not ideal for collaboration, scaling, or long-term dataset storage.
Limitations of VM disk storage
-
Scalability: Limited by disk size quota.
-
Sharing: Harder to share across projects or team
members.
- Cost: More expensive per GB compared to GCS for long-term storage.
What is a GCS bucket?
For most ML workflows in GCP, Google Cloud Storage (GCS)
buckets are recommended. A GCS bucket is a container in
Google’s object storage service where you can store an essentially
unlimited number of files. Data in GCS can be accessed from Vertex AI
training jobs, Workbench notebooks, and other GCP services using a
GCS URI (e.g.,
gs://your-bucket-name/your-file.csv).
GCS URIs — your cloud file paths
GCS URIs follow the format
gs://bucket-name/path/to/file.csv. Think of them as cloud
file paths. You’ll use these URIs throughout the workshop to reference
data in training scripts, notebooks, and SDK calls.
Benefits of using GCS (recommended for ML workflows)
- Separation of storage and compute: Data remains available even if VMs or notebooks are deleted.
- Easy sharing: Buckets can be accessed by collaborators with the right IAM roles.
- Integration with Vertex AI and BigQuery: Read and write data directly using other GCP tools.
- Scalability: Handles datasets of any size without disk limits.
- Cost efficiency: Lower cost than persistent disks (VM storage) for long-term storage.
- Data persistence: Durable and highly available across regions.
- Filesystem mounting: GCS buckets can be mounted as local directories using Cloud Storage FUSE, making them accessible like regular filesystems for tools that expect local file paths.
Recommended approach: GCS buckets
To upload our Titanic dataset to a GCS bucket, we’ll follow these steps:
- Log in to the Google Cloud Console.
- Create a new bucket (or use an existing one).
- Upload your dataset files.
- Use the GCS URI to reference your data in Vertex AI workflows.
1. Sign in to Google Cloud Console
- Go to console.cloud.google.com and log in with your credentials.
- Select your project from the project dropdown at the top of the page. If you’re using the shared workshop project, the instructor will provide the project name.
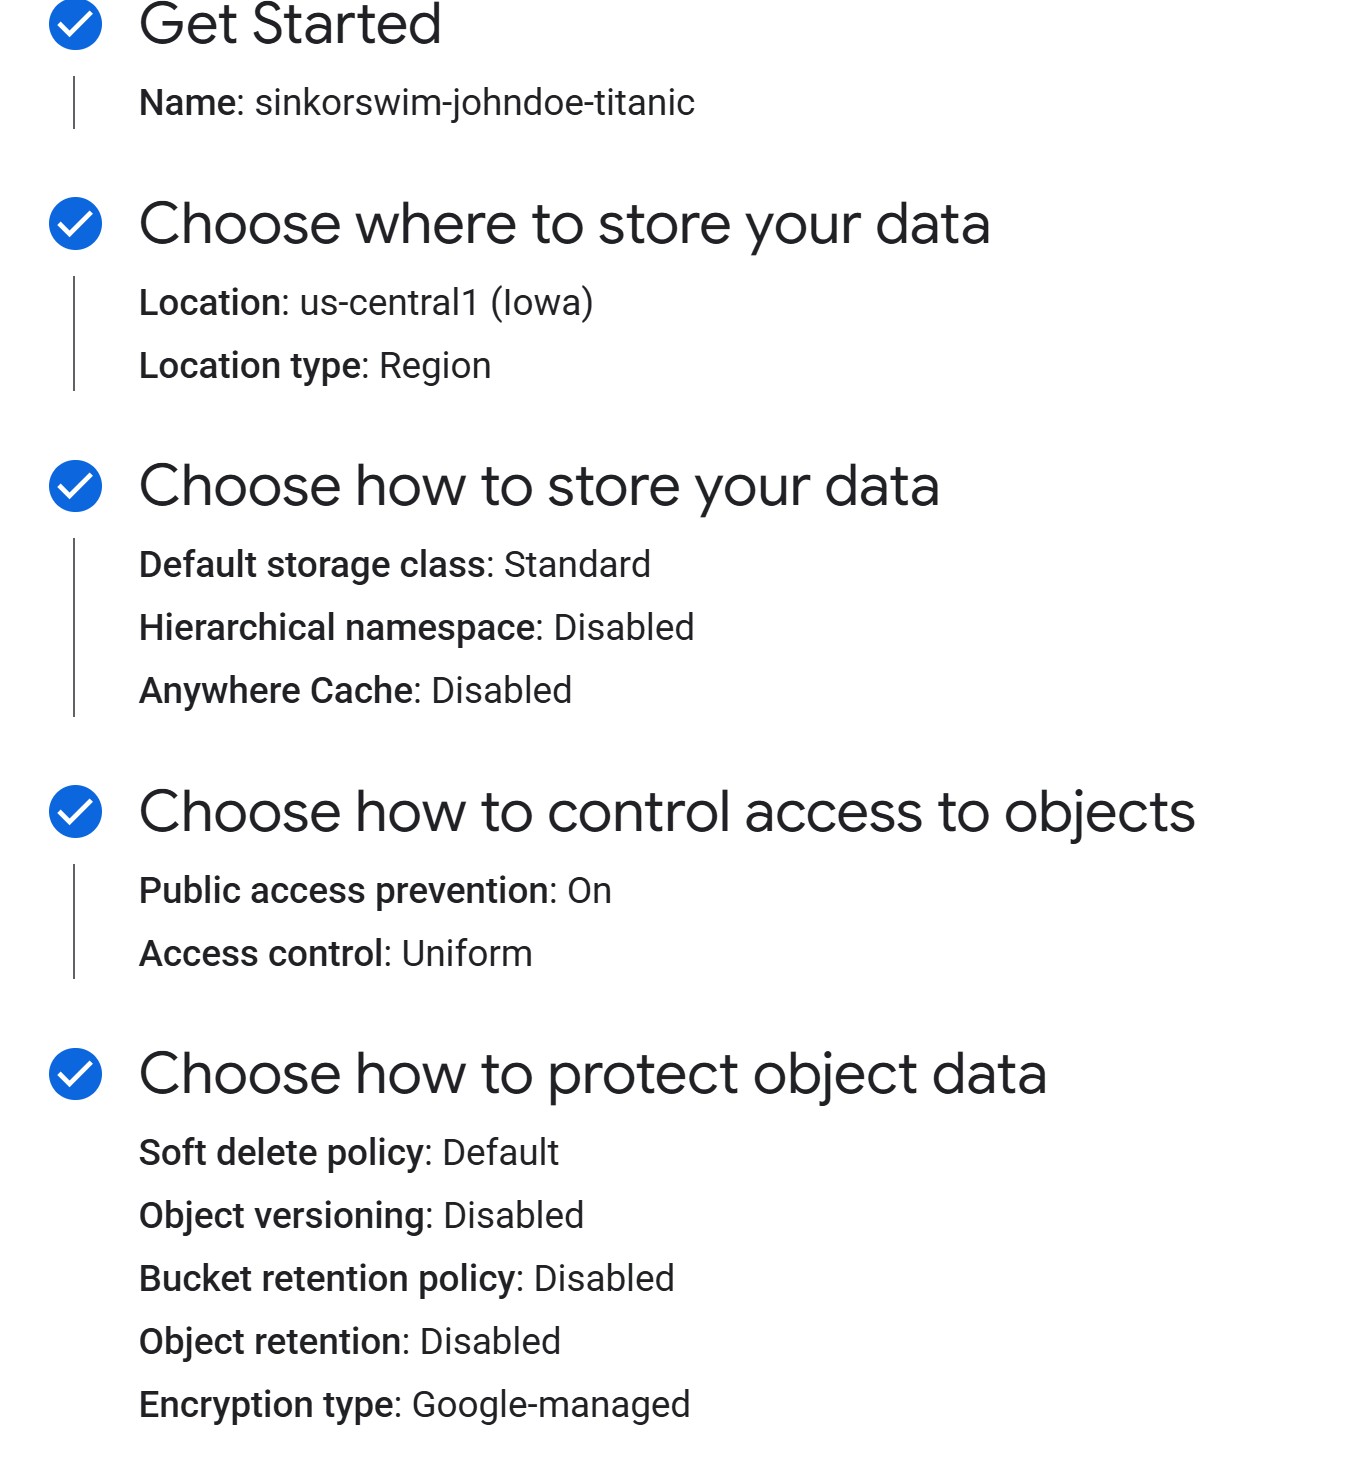
3. Create a new bucket
- Click Create bucket.
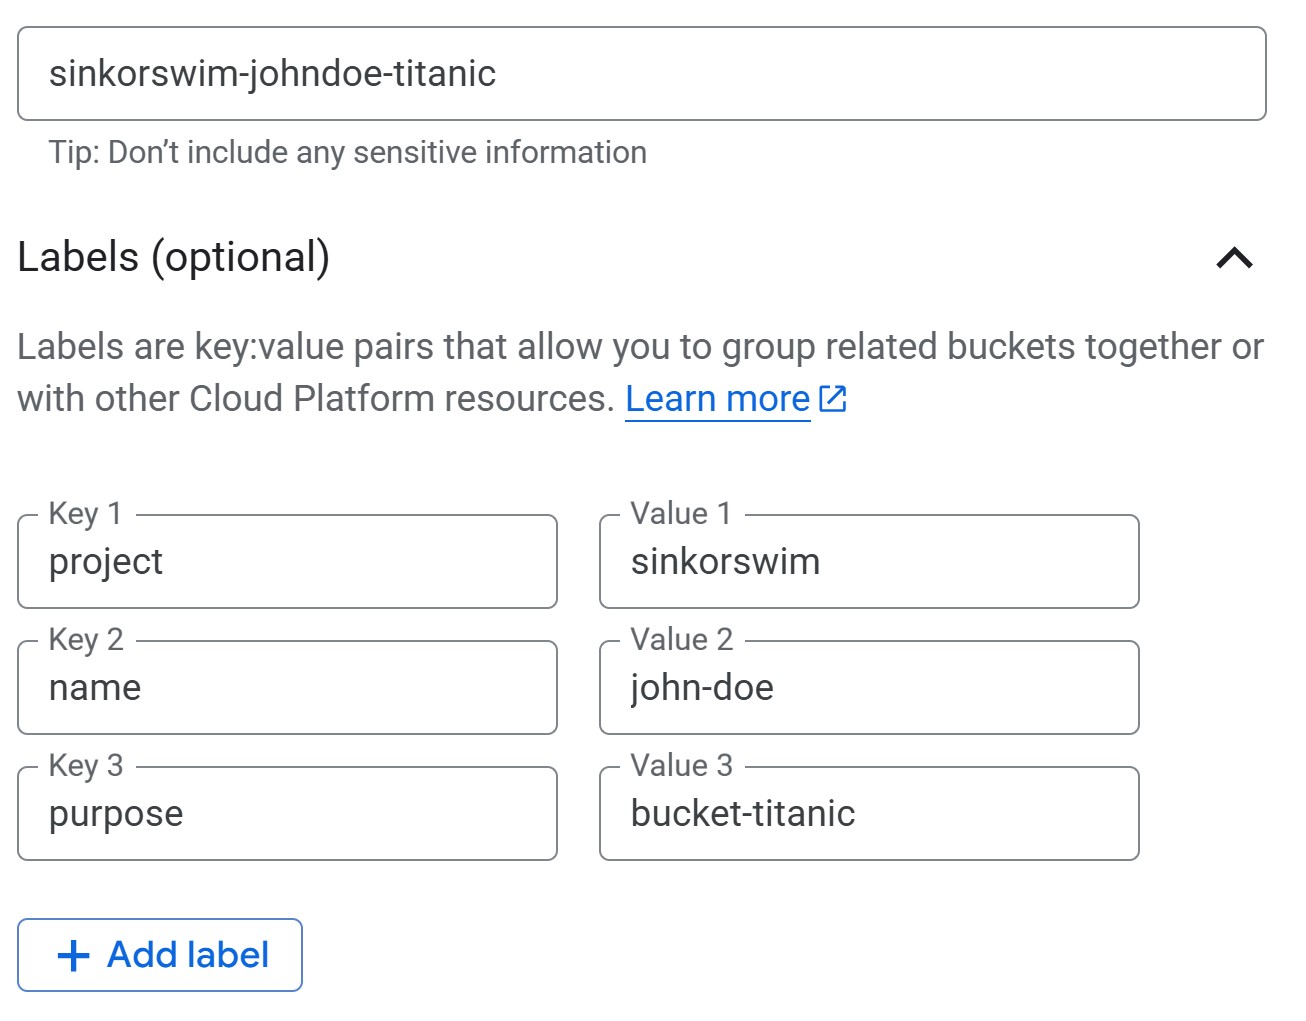
3a. Getting Started (bucket name and tags)
-
Provide a bucket name: Enter a globally unique
name. For this workshop, we can use the following naming convention to
easily locate our buckets:
teamname-firstlastname-dataname(e.g., sinkorswim-johndoe-titanic). If you see a “Bucket name already exists” error, the name is taken — try adding a number or extra initials to make it unique. -
Add labels (tags) to track costs: Add labels to
track resource usage and billing. If you’re working in a shared account,
this step is mandatory. If not, it’s still recommended to help
you track your own costs! In the Labels section, enter the key on the
left and the value on the right:
- key:
project, value:teamname(your team’s name) - key:
name, value:firstname-lastname(your name) - key:
purpose, value:bucket-dataname(include bucket- prefix followed by name of dataset)
- key:
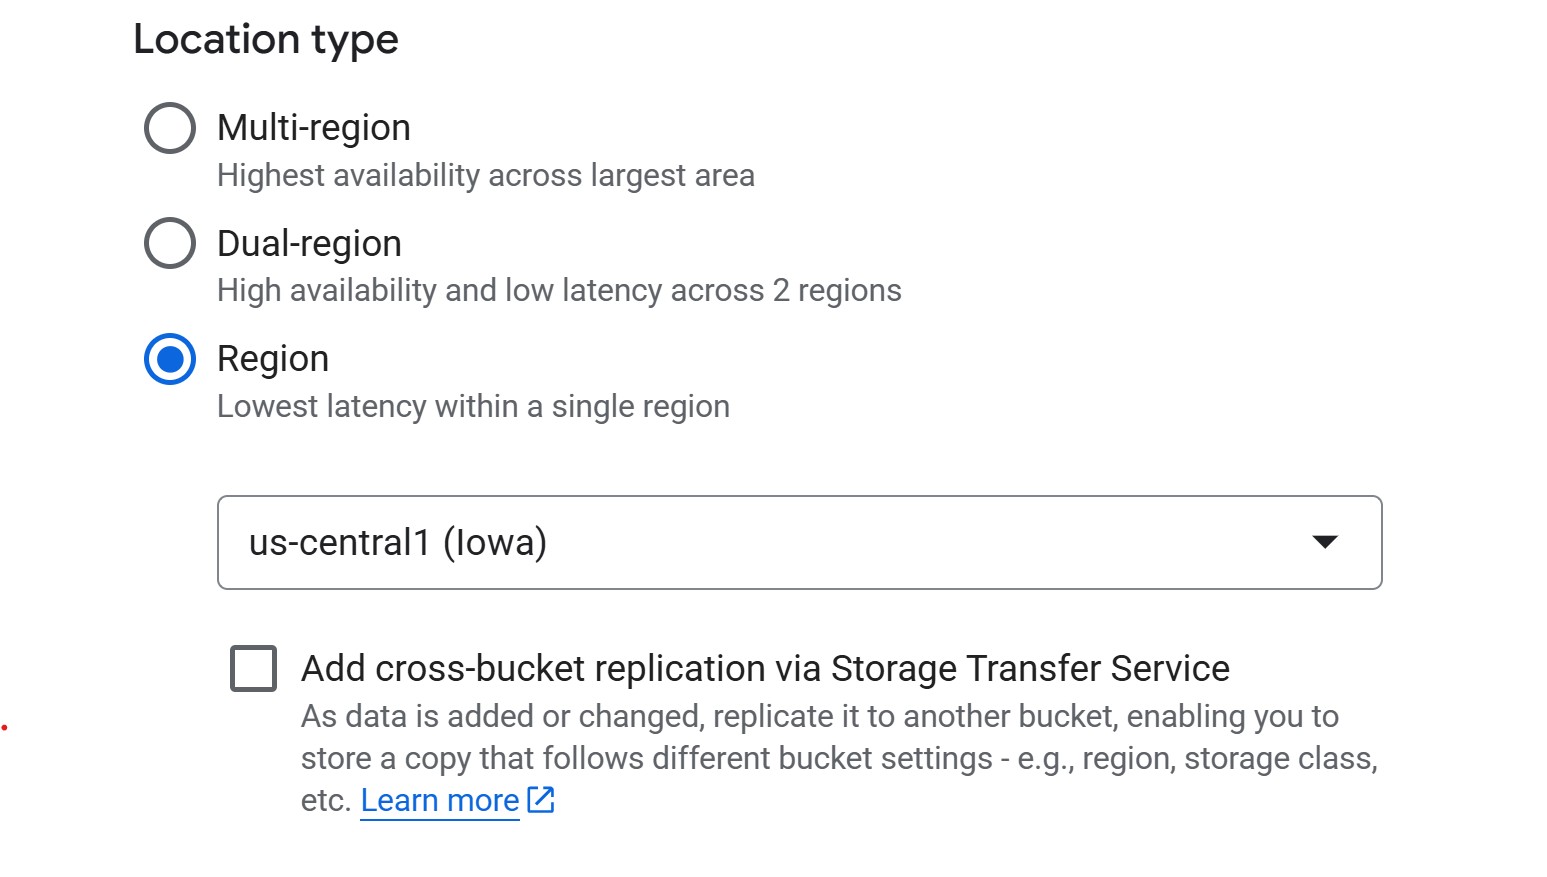
3b. Choose where to store your data
For ML workflows, use a regional bucket in the same
region as your compute resources (e.g., us-central1). This
minimizes latency and avoids egress charges when training jobs read from
storage. Multi-region is only needed if collaborators across different
regions need reliable access to the same data — the trade-off is higher
cost.
-
Region (cheapest, good default). For instance,
us-central1(Iowa) costs $0.020 per GB-month. - Multi-region (higher redundancy, more expensive). Useful when broad geographic availability matters more than cost.
3c. Choose how to store your data (storage class)
When creating a bucket, you’ll be asked to choose a storage class, which determines how much you pay for storing data and how often you’re allowed to access it without extra fees.
- Standard – best for active ML/AI workflows. Training data is read and written often, so this is the safest default.
- Nearline / Coldline / Archive – designed for backups or rarely accessed files. These cost less per GB to store, but you pay retrieval fees if you read them during training. Not recommended for most ML projects where data access is frequent.
GCS also supports lifecycle rules that can automatically delete objects older than N days or transition them to cheaper storage classes. This is useful for cleaning up experiment artifacts (e.g., old checkpoints). You can configure lifecycle rules after bucket creation under the bucket’s Lifecycle tab.
You may see an option to “Enable hierarchical namespace”. GCP now offers an option to enable a hierarchical namespace for buckets, but this is mainly useful for large-scale analytics pipelines. For most ML workflows, the standard flat namespace is simpler and fully compatible—so it’s best to leave this option off.
3d. Choose how to control access to objects
For ML projects, you should prevent public access so that only authorized users can read or write data. This keeps research datasets private and avoids accidental exposure.
When prompted to choose an access control method, choose uniform access unless you have a very specific reason to manage object-level permissions.
-
Uniform access (recommended): Simplifies management
by enforcing permissions at the bucket level using IAM roles. It’s the
safer and more maintainable choice for teams and becomes permanent after
90 days.
- Fine-grained access: Allows per-file permissions using ACLs, but adds complexity and is rarely needed outside of web hosting or mixed-access datasets.
3e. Choose how to protect object data
Leave the default soft delete enabled — it keeps deleted objects recoverable for 7 days, which is useful if someone accidentally removes data. Skip object versioning (creates new versions on every overwrite, costs add up fast) and retention policies (blocks deletion, only needed for regulatory compliance) unless you have a specific reason to enable them.
4. Upload files to the bucket
- If you haven’t yet, download the data for this workshop (Right-click
→ Save as): data.zip
- Extract the zip folder contents (Right-click → Extract all on Windows; double-click on macOS).
- The zip contains the Titanic dataset — passenger information (age, class, fare, etc.) with a survival label. This is a classic binary classification task we’ll use for training in later episodes.
- In the bucket dashboard, click Upload Files.
- Select your Titanic CSVs (
titanic_train.csvandtitanic_test.csv) and upload.
Note the GCS URI for your data After uploading,
click on a file and find its gs:// URI (e.g.,
gs://sinkorswim-johndoe-titanic/titanic_test.csv). This URI
will be used to access the data later.
Challenge: Verify Your Bucket Setup
Before moving on, confirm everything is configured correctly:
- Navigate to your bucket in Cloud Storage > Buckets. Can you see your uploaded CSV files listed?
- Click on one of the files. What is its
gs://URI? Write it down — you’ll need it in Episode 4. - Go back to the bucket overview and check the Labels tab. Are your cost-tracking labels (project, name, purpose) applied?
You should see both titanic_train.csv and
titanic_test.csv in your bucket. The URI should look like
gs://your-bucket-name/titanic_train.csv. Labels should
appear under the bucket’s Configuration or Labels tab with the key-value
pairs you entered in step 3a.
If any labels are missing, click Edit labels on the bucket details page to add them.
Adjust bucket permissions
We need to grant the Compute Engine default service account three separate IAM roles so that our future Workbench notebooks and training jobs can interact with the bucket:
-
objectViewer— allows reading (downloading) objects from the bucket. Required for loading training data. -
objectCreator— allows uploading new objects. Required for writing model artifacts and logs. -
objectAdmin— allows overwriting and deleting objects. Only needed if your workflow re-saves models or cleans up old artifacts.
To run these commands, open Cloud Shell — a
browser-based terminal built into the Google Cloud Console. Click the
terminal icon (>_) in the top-right toolbar of the
Console to activate it. Cloud Shell comes with gcloud
pre-installed and already authenticated to your project.
Find your service account
Before running the commands below, you need your project’s Compute Engine default service account. Run this in Cloud Shell:
SH
gcloud iam service-accounts list --filter="displayName:Compute Engine default service account" --format="value(email)"This will return an email like
123456789-compute@developer.gserviceaccount.com. Use that
value in the commands below.
Grant permissions
Replace YOUR_BUCKET_NAME with your bucket name and
YOUR_SERVICE_ACCOUNT with the email from the step above,
then run:
SH
# Grant read permissions on the bucket
gcloud storage buckets add-iam-policy-binding gs://YOUR_BUCKET_NAME \
  --member="serviceAccount:YOUR_SERVICE_ACCOUNT" \
  --role="roles/storage.objectViewer"

# Grant write permissions on the bucket
gcloud storage buckets add-iam-policy-binding gs://YOUR_BUCKET_NAME \
  --member="serviceAccount:YOUR_SERVICE_ACCOUNT" \
  --role="roles/storage.objectCreator"

# (Only if you also need overwrite/delete)
gcloud storage buckets add-iam-policy-binding gs://YOUR_BUCKET_NAME \
  --member="serviceAccount:YOUR_SERVICE_ACCOUNT" \
  --role="roles/storage.objectAdmin"
This grants our future VMs permission to read, write, and manage objects in the bucket.
gcloud storage
vs. gsutil
Older tutorials often reference gsutil for Cloud Storage
operations. Google now recommends gcloud storage as the
primary CLI. Both work, but gcloud storage is actively
maintained and consistent with the rest of the gcloud
CLI.
Data transfer & storage costs explained
GCS costs are based on storage class, data transfer, and operations (requests).
-
Standard storage: Data storage cost is based on
region. In
us-central1, the cost is ~$0.02 per GB per month. -
Uploading data (ingress): Copying data into a GCS
bucket from your laptop, campus HPC, or another provider is free.
-
Downloading data out of GCP (egress): Refers to
data leaving Google’s network to the public internet, such as
downloading files from GCS to your local machine. Typical cost is around
$0.12 per GB to the U.S. and North America, more for other continents.
-
Cross-region access: If your bucket is in one
region and your compute runs in another, you’ll pay an egress fee of
about $0.01–0.02 per GB within North America, higher if crossing
continents.
-
Cross-region access: If your bucket is in one
region and your compute runs in another, you’ll pay an egress fee of
about $0.01–0.02 per GB within North America, higher if crossing
continents.
-
Reading (GET) requests: Each read or list operation
incurs a small API request fee of roughly $0.004 per 10,000 requests.
- Example: a training job that loads 10,000 image samples from GCS
(one per batch) would make about 10,000 GET requests, costing around
$0.004 total. Reading a large file such as a 1 GB CSV or TFRecord shard
counts as a single GET request.
- Example: a training job that loads 10,000 image samples from GCS
(one per batch) would make about 10,000 GET requests, costing around
$0.004 total. Reading a large file such as a 1 GB CSV or TFRecord shard
counts as a single GET request.
-
Writing (PUT/POST/LIST) requests: Uploading,
creating, or modifying objects costs about $0.05 per 10,000 requests.
- Example: saving one model checkpoint file (e.g.,
model-weights.h5ormodel.pt) triggers one PUT request. A training pipeline that saves a few dozen checkpoints or logs would cost well under one cent in request fees.
- Example: saving one model checkpoint file (e.g.,
- Deleting data: Removing objects or buckets does not incur transfer costs. If you download data before deleting, you pay for the egress, but deleting directly in the console or CLI is free. For Nearline, Coldline, or Archive storage classes, deleting before the minimum storage duration (30, 90, or 365 days) triggers an early-deletion fee.
For detailed pricing, see GCS Pricing Information.
Challenge: Estimating Storage Costs
1. Estimate the total cost of storing 1 GB in GCS Standard
storage (us-central1) for one month assuming:
- Storage duration: 1 month
- Dataset retrieved 100 times for model training and tuning
- Data is downloaded once out of GCP at the end of the project
Hints
- Storage cost: $0.02 per GB per month
- Egress (download out of GCP): $0.12 per GB
- GET requests: $0.004 per 10,000 requests (100 requests ≈
free for our purposes)
2. Repeat the above calculation for datasets of 10 GB, 100 GB, and 1 TB (1024 GB).
-
1 GB:
- Storage: 1 GB × $0.02 = $0.02
- Egress: 1 GB × $0.12 = $0.12
- Requests: ~0 (100 reads well below pricing tier)
- Total: $0.14
-
10 GB:
- Storage: 10 GB × $0.02 = $0.20
- Egress: 10 GB × $0.12 = $1.20
- Requests: ~0
- Total: $1.40
-
100 GB:
- Storage: 100 GB × $0.02 = $2.00
- Egress: 100 GB × $0.12 = $12.00
- Requests: ~0
- Total: $14.00
-
1 TB (1024 GB):
- Storage: 1024 GB × $0.02 = $20.48
- Egress: 1024 GB × $0.12 = $122.88
- Requests: ~0
- Total: $143.36
Removing unused data (complete after the workshop)
After you are done using your data, remove unused files/buckets to stop costs:
- Option 1: Delete files only – In your bucket, select the files you want to remove and click Delete. Use this if you plan to reuse the bucket for new data.
- Option 2: Delete the bucket entirely – In Cloud Storage > Buckets, select your bucket and click Delete. You’ll be asked to confirm by typing the bucket name.
For a detailed walkthrough of cleaning up all workshop resources (buckets, VMs, endpoints, and more), see Episode 9: Resource Management and Cleanup.
When does BigQuery come into play?
BigQuery is Google Cloud’s managed data warehouse for storing and analyzing large tabular datasets using SQL. It’s designed for interactive querying and analytics rather than file storage. For most ML workflows—especially smaller projects or those focused on images, text, or modest tabular data—BigQuery isn’t needed. Cloud Storage (GCS) buckets are usually enough: they can store data efficiently and let you stream files directly into your training code without downloading them locally.
BigQuery becomes useful when you’re working with large, structured datasets that multiple team members need to query or explore collaboratively. Instead of reading entire files, you can use SQL to retrieve only the subset of data you need. Teams can share results through saved queries or views and control access at the dataset or table level with IAM. BigQuery also integrates with Vertex AI, allowing structured data stored there to connect directly to training pipelines. The main trade-off is cost: you pay for both storage and the amount of data scanned by queries.
In short, use GCS buckets for storing and streaming files into typical ML workflows, and consider BigQuery when you need a shared, queryable workspace for large tabular datasets.
- Use GCS for scalable, cost-effective, and persistent storage in
GCP.
- Persistent disks are suitable only for small, temporary
datasets.
- Track your storage, transfer, and request costs to manage
expenses.
- Regularly delete unused data or buckets to avoid ongoing costs.