Notebooks as Controllers
Last updated on 2026-03-03 | Edit this page
Estimated time: 35 minutes
Overview
Questions
- How do you set up and use Vertex AI Workbench notebooks for machine
learning tasks?
- How can you manage compute resources efficiently using a “controller” notebook approach in GCP?
Objectives
- Describe how Vertex AI Workbench notebooks fit into ML workflows on GCP.
- Set up a Jupyter-based Workbench Instance as a lightweight controller to manage compute tasks.
- Configure a Workbench Instance with appropriate machine type, labels, and idle shutdown for cost-efficient orchestration.
Setting up our notebook environment
Google Cloud Workbench provides JupyterLab-based environments that can be used to orchestrate machine learning workflows. In this workshop, we will use a Workbench Instance—the recommended option going forward, as other Workbench environments are being deprecated.
Workbench Instances come with JupyterLab 3 pre-installed and are configured with GPU-enabled ML frameworks (TensorFlow, PyTorch, etc.), making it easy to start experimenting without additional setup. Learn more in the Workbench Instances documentation.
Using the notebook as a controller
The notebook instance functions as a controller to manage
more resource-intensive tasks. By selecting a modest machine type (e.g.,
n2-standard-2), you can perform lightweight operations
locally in the notebook while using the Vertex AI Python
SDK to launch compute-heavy jobs on larger machines (e.g.,
GPU-accelerated) when needed.
This approach minimizes costs while giving you access to scalable infrastructure for demanding tasks like model training, batch prediction, and hyperparameter tuning.
One practical advantage of Workbench notebooks: authentication is automatic. A Workbench VM inherits the permissions of its attached service account, so calls to Cloud Storage, Vertex AI, and the Gemini API work with no extra credential setup. If you run the same code from your laptop or an HPC cluster, you’ll need to configure Application Default Credentials separately.
We will follow these steps to create our first Workbench Instance:
1. Navigate to Workbench
- In the Google Cloud Console, search for “Workbench.”
- Click the “Instances” tab (this is the supported path going
forward).
- Pin Workbench to your navigation bar for quick access.
2. Create a new Workbench Instance
Initial settings
- Click Create New near the top of the Workbench page
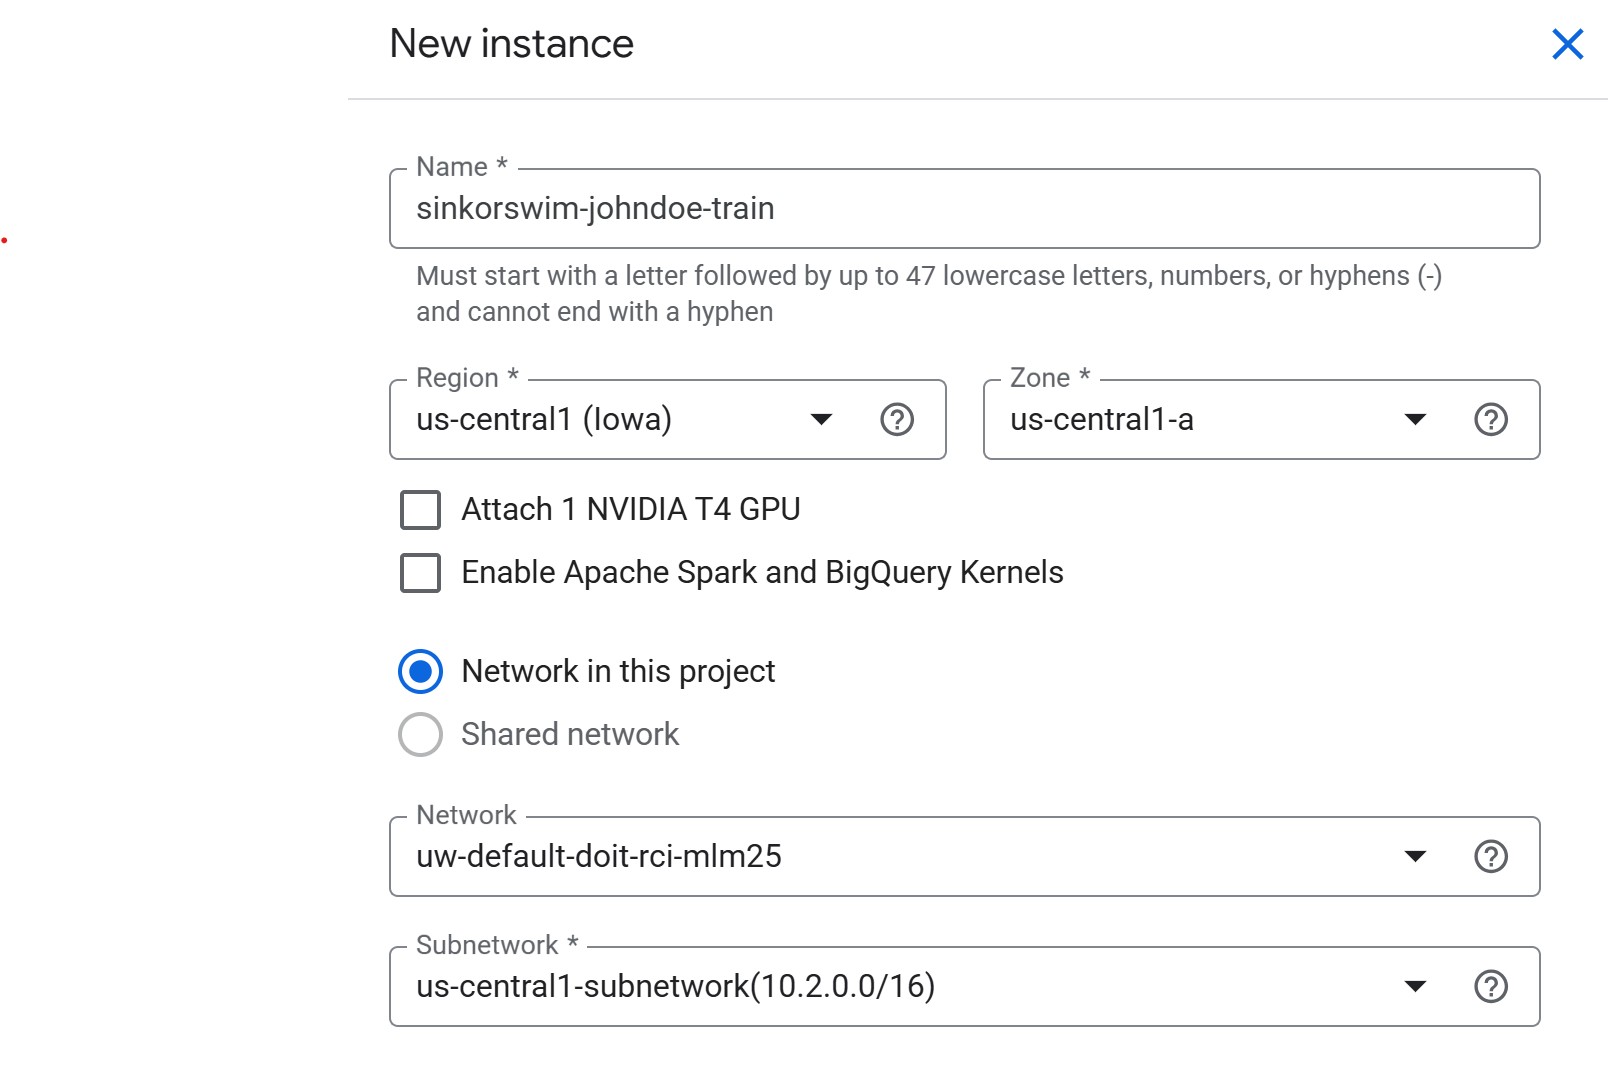
-
Name: For this workshop, we can use the following
naming convention to easily locate our notebooks:
teamname-yourname-purpose(e.g., sinkorswim-johndoe-train) -
Region: Choose the same region as your storage
bucket (e.g.,
us-central1). This avoids cross-region transfer charges and keeps data access latency low.- If you are unsure, check your bucket’s location in the Cloud Storage console (click the bucket name → look under “Location”).
-
Zone:
us-central1-a(or another zone inus-central1, like-bor-c)- If capacity or GPU availability is limited in one zone, switch to another zone in the same region.
-
NVIDIA T4 GPU: Leave unchecked for now
- We will request GPUs for training jobs separately. Attaching here increases idle costs.
-
Apache Spark and BigQuery Kernels: Leave unchecked
- Enable only if you specifically need Spark or BigQuery notebooks; otherwise, it adds unnecessary images.
- Network in this project: If you’re working in a shared workshop environment, select the network provided by your administrator (shared environments typically do not allow using external or default networks). If using a personal GCP project, the default network is fine.
-
Network / Subnetwork: Leave as pre-filled.
Advanced settings: Details (tagging)
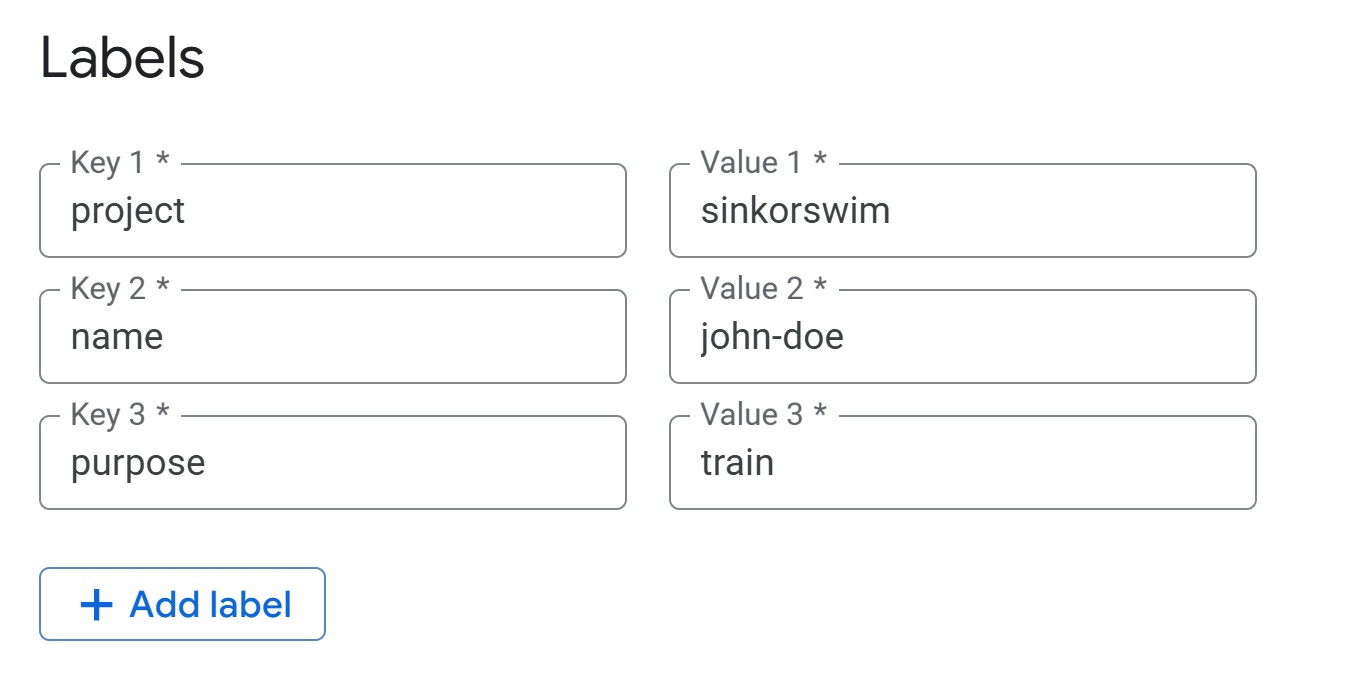
-
IMPORTANT: Open the “Advanced options” menu next.
-
Labels (required for cost tracking): Under the
Details menu, add the following tags (all lowercase) so that you can
track the total cost of your activity on GCP later:
-
project = teamname(your team’s name) -
name = name(firstname-lastname) -
purpose = train(i.e., the notebook’s overall purpose — train, tune, RAG, etc.)
-
-
Labels (required for cost tracking): Under the
Details menu, add the following tags (all lowercase) so that you can
track the total cost of your activity on GCP later:
Advanced Settings: Environment
Leave environment settings at their defaults for this workshop.
Workbench uses JupyterLab 3 by default with NVIDIA GPU drivers, CUDA,
and common ML frameworks preinstalled. For future reference, you can
optionally select JupyterLab 4, provide a custom Docker image, or
specify a post-startup script (gs://path/to/script.sh) to
auto-configure the instance at boot.
Advanced settings: Machine Type
-
Machine type: Select a small machine (e.g.,
n2-standard-2) to act as the controller.- This keeps costs low while you delegate heavy lifting to training
jobs.
- For guidance on common machine types for ML, refer to Instances for ML on GCP.
- This keeps costs low while you delegate heavy lifting to training
jobs.
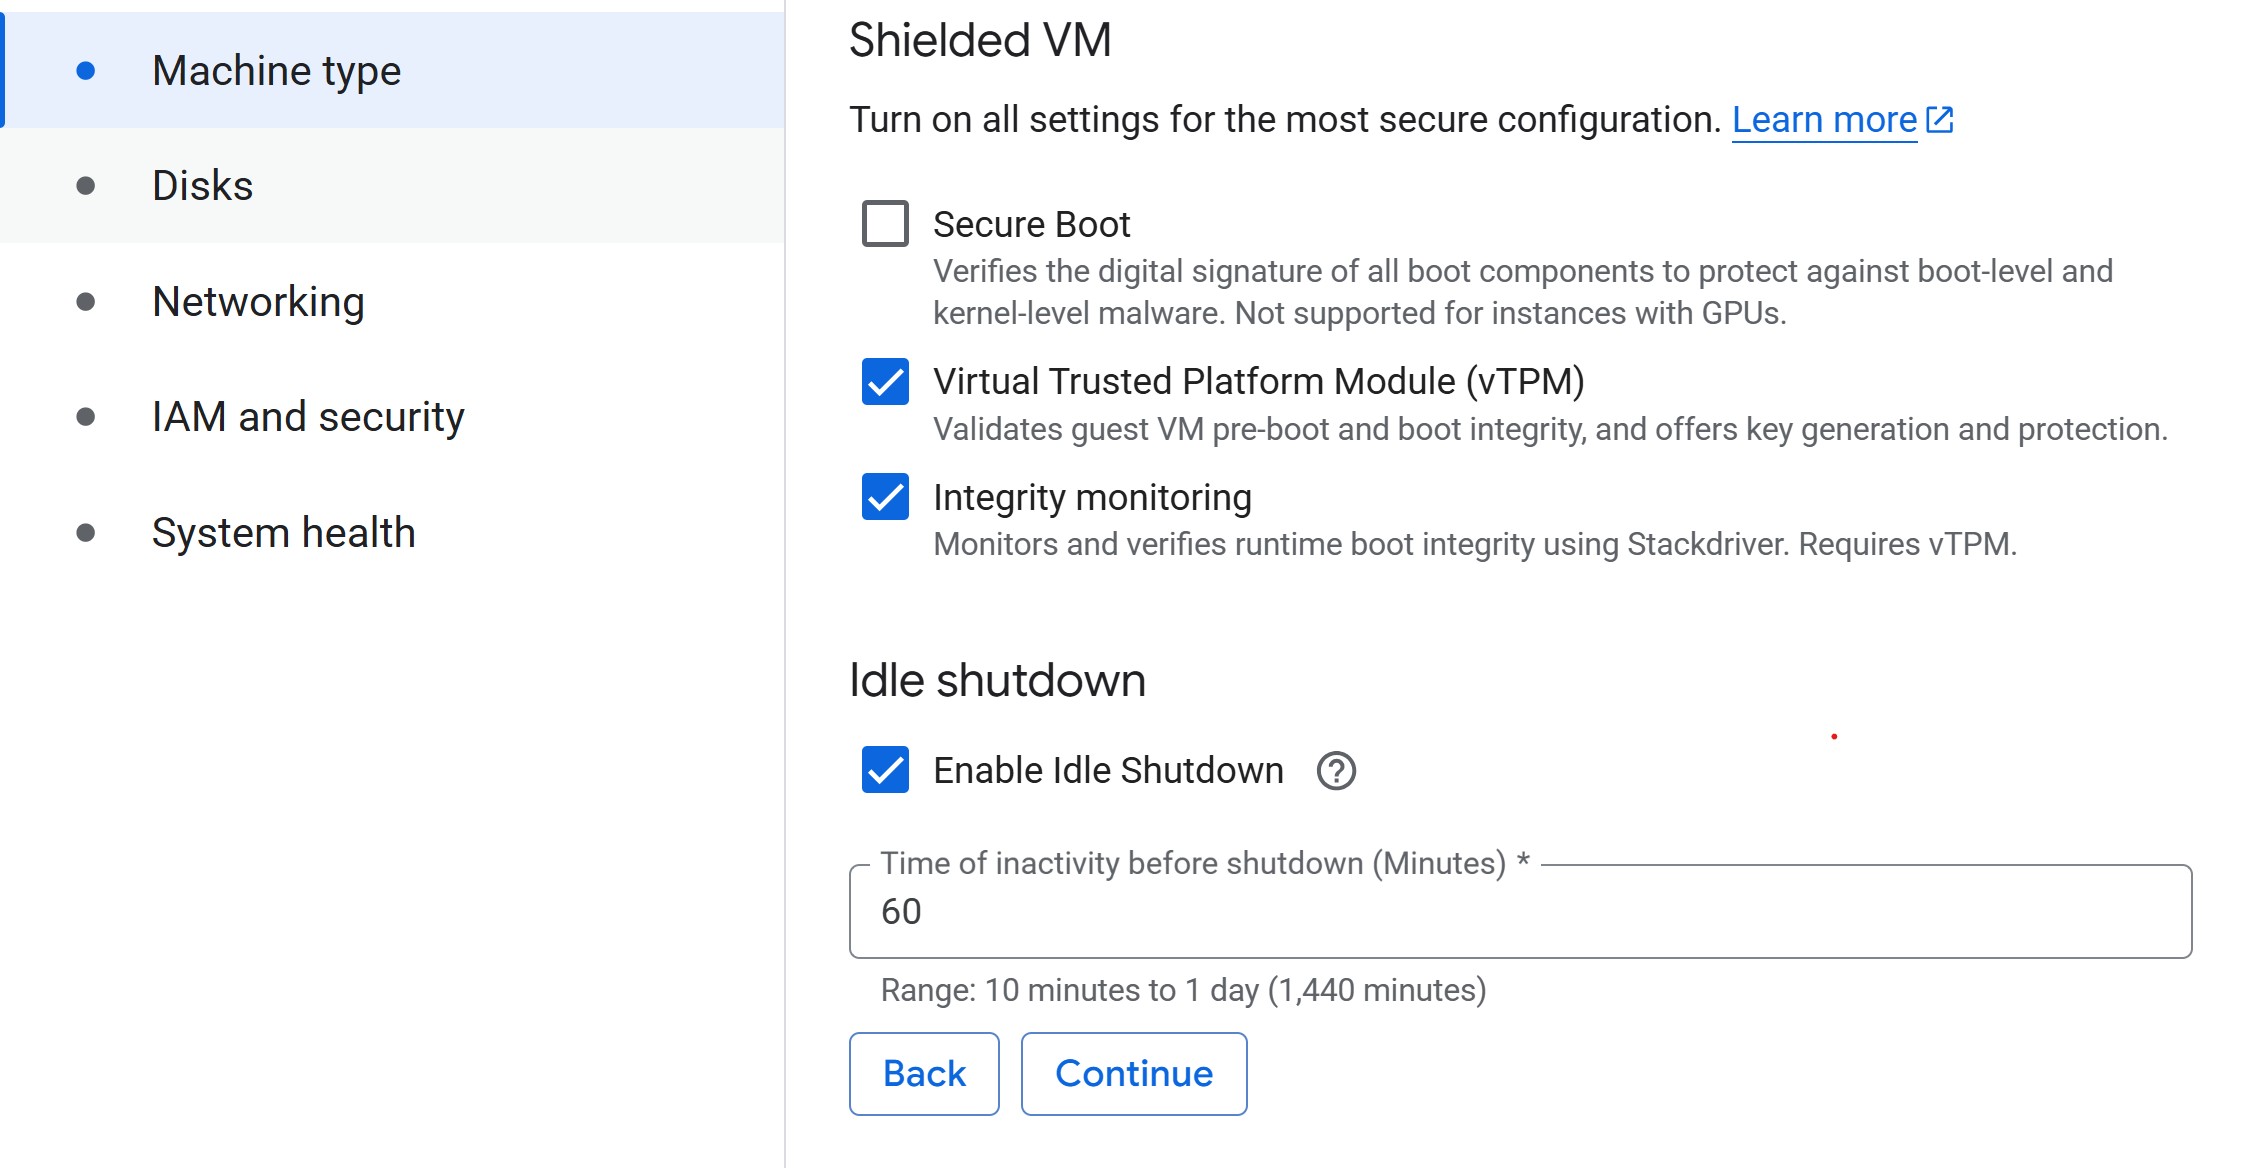
- Set idle shutdown: To save on costs when you aren’t doing anything in your notebook, lower the default idle shutdown time to 60 (minutes).
Advanced Settings: Disks
Leave disk settings at their defaults for this workshop. Each Workbench Instance has two disks: a boot disk (100 GB — holds the OS and libraries) and a data disk (150 GB default — holds your datasets and outputs). Both use Balanced Persistent Disks. Keep “Delete to trash” unchecked so deleted files free space immediately.
Rule of thumb: allocate ≈ 2× your dataset size for
the data disk, and keep bulk data in Cloud Storage (gs://)
rather than on local disk — PDs cost ~$0.10/GB/month vs. ~$0.02/GB/month
for Cloud Storage.
Disk sizing and cost details
- Boot disk: Rarely needs resizing. Increase to 150–200 GB only for large custom environments or multiple frameworks.
- Data disk: Use SSD PD only for high-I/O workloads. Disks can be resized anytime without downtime, so start small and expand when needed.
- Cost comparison: A 200 GB dataset costs ~$24/month on a PD but only ~$5/month in Cloud Storage.
- Pricing: Persistent Disk pricing · Cloud Storage pricing
Create notebook
- Click Create to create the instance. Provisioning typically takes 3–5 minutes. You’ll see the status change from “Provisioning” to “Running” with a green checkmark. While waiting, work through the challenges below.
Challenge 1: Notebook Roles
Your university provides different compute options: laptops, on-prem HPC, and GCP.
- What role does a Workbench Instance notebook play compared to an HPC login node or a laptop-based JupyterLab?
- Which tasks should stay in the notebook (lightweight control, visualization) versus being launched to larger cloud resources?
The notebook serves as a lightweight control plane. - Like an HPC login node, it is not meant for heavy computation. - Suitable for small preprocessing, visualization, and orchestrating jobs. - Resource-intensive tasks (training, tuning, batch jobs) should be submitted to scalable cloud resources (GPU/large VM instances) via the Vertex AI SDK.
Challenge 2: Controller Cost Estimate
Your controller notebook uses an n2-standard-2 instance
(~$0.07/hr).
- Estimate the monthly cost if you use it 8 hours/day, 5 days/week, with idle shutdown enabled.
- Compare that to leaving it running 24/7 for the same month.
- With idle shutdown: 8 hrs × 5 days × 4 weeks = 160 hrs → 160 × $0.07 ≈ $11.20/month
- Running 24/7: 24 hrs × 30 days = 720 hrs → 720 × $0.07 ≈ $50.40/month
- Idle shutdown saves you ~$39/month on a single small controller instance. The savings are even larger for bigger machine types.
Managing your instance
You don’t have to wait for idle shutdown — you can manually stop your instance anytime from the Workbench Instances list by selecting the checkbox and clicking Stop. To resume work, click Start. You only pay for compute while the instance is running (disk charges continue while stopped).
To permanently remove an instance, select it and click Delete. Full cleanup is covered in Episode 9.
Managing training and tuning with the controller notebook
In the following episodes, we will use the Vertex AI Python
SDK (google-cloud-aiplatform) from this notebook
to submit compute-heavy tasks on more powerful machines. Examples
include:
- Training a model on a GPU-backed instance.
- Running hyperparameter tuning jobs managed by Vertex AI.
This pattern keeps costs low by running your notebook on a modest VM while only incurring charges for larger resources when they are actively in use.
You don’t need a notebook to use Vertex AI
We use Jupyter notebooks in this workshop because they’re convenient for teaching — you can see code, output, and explanations in one place. But notebooks are not required for any of the workflows covered here. Everything we do through the Python SDK (submitting training jobs, running hyperparameter tuning, calling the Gemini API) can also be done from:
- A plain Python script run from your terminal or an HPC scheduler.
- The
gcloudCLI (e.g.,gcloud ai custom-jobs create ...) for submitting and managing jobs directly from the command line. - A CI/CD pipeline (GitHub Actions, Cloud Build, etc.) that triggers training runs automatically.
If you’re more comfortable working from a terminal, SSH session, or shell script, the same Vertex AI SDK calls work identically outside of a notebook. The notebook is just a convenient wrapper — the real work happens in the training scripts and SDK calls.
Troubleshooting
-
VM stuck in “Provisioning” for more than 5 minutes?
Try deleting the instance and re-creating it in a different zone within
the same region (e.g.,
us-central1-binstead ofus-central1-a). - Instance stopped unexpectedly? Check the idle shutdown setting — it may have timed out. Restart from the Instances list by clicking Start.
- Can’t see the project or get permission errors? Ensure you’re signed into the correct Google account and that IAM permissions have propagated (this can take a few minutes after initial setup).
Load pre-filled Jupyter notebooks
Once your instance shows as “Running” (green checkmark), click Open JupyterLab. From the Launcher, select Python 3 (ipykernel) under Notebook to create a new notebook — we don’t need the TensorFlow or PyTorch kernels yet, as those are used in later episodes for training jobs.
Run the following command to clone the lesson repository. This contains pre-filled notebooks for each episode and the training scripts we’ll use later, so you won’t need to write boilerplate code from scratch.
Then, navigate to
/Intro_GCP_for_ML/notebooks/04-Accessing-and-managing-data.ipynb
to begin the next episode.
- Use a small Workbench Instance notebook as a controller to manage larger, resource-intensive tasks.
- Workbench VMs automatically inherit service account permissions, simplifying authentication for Cloud Storage, Vertex AI, and Gemini API calls.
- Always navigate to the “Instances” tab in Workbench, since older notebook types are deprecated.
- Choose the same region for your Workbench Instance and storage bucket to avoid extra transfer costs.
- Submit training and tuning jobs to scalable instances using the Vertex AI SDK.
- Labels help track costs effectively, especially in shared or multi-project environments.
- Workbench Instances come with JupyterLab 3 and GPU frameworks preinstalled, making them an easy entry point for ML workflows.
- Enable idle auto-stop and manually stop instances when not in use to avoid unexpected charges.